Sunday, October 14, 2018

Interactive Slider Halloween Card

Sunny Studio Stamps Slider Die

This year I am really drawn to Halloween products and I'm using them like crazy.  For this card, I combined the Sunny Studio Stamps Slider die with the Halloween stamps from Catherine Pooler Designs and Halloween-themed dies from Lawn Fawn.  The front panel is Kraft cardstock stamped with the Going Batty background stamp (CPD) using Versafine Black Onyx ink and then embossed with clear Wow embossing powder.  Then I die cut the panel using the interactive slider die (Sunny Studio).


The bat dies are from the Lawn Fawn Tiny Gift Box Bat add-on set.  I love this little guy!  The black cardstock I used for the card is Gina K Designs Black Onyx.  The grey and white paper pieces are from my scrap bin and the orange sparkle cardstock that I used for the bat's wings and feet is from the Lawn Fawn Autumn Sparkle Cardstock pack.


The sentiment strip (cut by hand), and the sentiments and images used under the slider tab, are from the Everything But the Broom stamp set by Catherine Pooler Designs.  I also stamped a "pull here" sentiment from the Lawn Fawn Push Here stamp set to let the recipient know that this is an interactive card.


I stamped the sentiments and images in Versafine embossing ink and embossed them with clear Wow embossing powder.  It's hard to capture in the pictures, but it shows up well in person.


Above and below show the slider at various stages of movement.


The sentiment and images on the inside of the card adds to the cute Halloween mood of the card.  Boo!  (Everything But the Broom)


Friday, October 12, 2018

Foiled Anniversary Cards

Gina K Designs Foil-mates

The Foil-mates designs include quite a variety of patterns and they are suitable for a lot of occasions. I decided to use some of them for anniversary cards for our parents.  Both anniversaries fall in October, but I wanted to use brighter colours because the weather has been terrible here - it is supposed to be fall, not winter!

For the card bases, I used Gina K Designs cardstock in Moonlit Fog and Turquoise Sea.

The foiled card panels are Gina K Designs Foil-mates foiled in Sweet Mango and Jelly Bean Green. 

I added sentiments, also from the Gina K Designs Foil-mates lines, that were foiled using Wild Dandilion and Turquoise Sea foils.

The foiled sentiments are popped-up on the panels using 3M foam tape.

On the inside of the card I stamped “Happy Anniversary” using a wood mounted stamp by Hero Arts that I have had in my stash for years.

I’ve used this stamp often; it is a staple!

Below are a side shots that show some of the shine on the foil.


Below is an image of the Foil-mates selection that I used for these cards.


Wednesday, October 10, 2018

Happy Halloween Witchy Lady!

Haunted Halloween Scene

These images were stamped in silhouette, using Midnight ink by Catherine Pooler Designs, on a Distress Oxide ink blended background.  The ink blended background was spritzed with water from a Distress Sprayer and dabbed with a paper towel.  The Halloween images are from the Spooky Hollow stamp set by Catherine Pooler Designs - CPD had a really fun Halloween release this year!


The card base is Nina Kraft cardstock with rectangles of patterned paper added underneath the box for a pop of colour.  The purple argyle paper is from the Sunny Studio Stamps Preppy Prints 6 x 6 paper pack.


The pop-up box and the bat are both from Lawn Fawn.  The box is the new Mini Pop-Up Box and the Bat is the Tiny Gift Box Bat add-on, also from the latest release.   The Bat add-on includes all the dies you need to create the cute little bat as well as the pop up banner.  The sentiment I used on the banner if from Lawn Fawn's Pick of the Patch stamp set.


This little bat is so adorable!  I used Gina K Designs Black Onyx paper for the box and face, with scraps of grey and white to create the detail.  The sparkle cardstock for the wings comes from Lawn Fawn's Autumn Sparkle Cardstock.


A close-up of the great sentiment from the Spooky Hollow set!  "Witchy lady" - it's so fun!

Monday, October 08, 2018

Clean and Simple Bithday Card

Using Christmas Themed Items for Other Purposes

The new Concord & 9th Christmas release is incredible, as their holiday releases always are.  But, I needed a birthday card fairly quickly and this release had just arrived in my mailbox.  So, here’s my take on a birthday card using images and dies from Christmas-themed sets.

I started by taking a short “diamond” border die and placing it in my MISTI.  Each time that I changed colours, I moved the card panel upward half an inch which gave me an even distribution over the panel. 


I decided to use a rainbow colour palate of Catherine Pooler Designs inks to make a bright background the star of the show.

Once the stamped panel was complete, I die cut it using the largest sized die in the Small Rectangle Stackable dies.  I then cut a scrap of Bazzil Bling cardstock, to place behind the stamped panel, in blue for the full sized card front panel.  I used the A2 sized Rectangle Stitched Stackable die from Lawn Fawn’s large set of rectangle stackable dies to match the pattern on both panels.  Next, I die cut the Holly Jolly banner die from a scrap of dark pink Bazzil Bling cardstock and stamped the Happy Birthday sentiment using Versafine Onyx Black ink.  I had to stamp the sentiment more than once because the cardstock was textured.  My MISTI is one of my favourite cardmaking tools, and this is why - it makes cardmaking so much easier.


I adhered the banner using three layers of 3M foam tape, for the popped-up section, and Lawn Fawn glue tube for the base parts that attach to the card.


The sentiments are from the Reverse Confetti Birthday Wishes stamp set.  I used the "So Many Candles.  So Little Cake" on the inside.

Saturday, October 06, 2018

Interactive Reveal Wheel Halloween Card

Reveal Wheel Card

The Reveal Wheel die set by Lawn Fawn is simple and well designed.  I love that it is so easy to use.

I die cut two panels with the largest die in the set and used the pumpkin-shaped insert die to create the reveal wheel hole.  On the front panel I used paper from the Lawn Fawn Knit Picky Fall 6 x 6 paper pack, cut to the appropriate shape using the panel die.  The green paper is my "grass" and the orange paper is the "sky". I love everything about Lawn Fawn products, but how great is this paper?  The Pick of the Patch stamp set and matching dies are a great Halloween and fall-themed set that work perfectly with this interactive card die set.

I coloured the spinning wheel, inside the embossed line, with the same Copic markers that I used to colour the pumpkins.  Then I stamped several of the faces on the spinning wheel to show through the pumpkin-shaped image.  I coloured several squirrels and their accessories to include in my scene.  Putting the scene together was so much fun!

How great are the faces in this set!


Check out the great little details that Lawn Fawn puts in their die sets (that cute little arrow) and the stamp sets (that happy little squirrel and the lid for the pumpkin).  How can you not love Lawn Fawn?


Halloween Shadow Box Tunnel Card

Ghosts, Bats and a Black Cat

The Spellbinders Large and Small Die-of-the-Month Kits for September 2018 had a Halloween theme.  Yay!  I used the dies from the Small Die set, along with others in my stash, to create this card.


All of the panels for the card are ink blended using Distress Oxide inks in Seedless Preserves, Dusty Concord and Black Soot.  They were then given some texture using water, a Distress Sprayer and a paper towel to blot the sprayed water.  On the front of the card, the bats and the ghosts are from the Spellbinders Small Die set.  The fence is a die from a recent release from Lawn Fawn.  The spider, spider web and the sentiment are stamps from the Everything But the Broom stamp set by Catherine Pooler Designs.


In this close-up of the inside you can see the layers in the box card.  On the layers I added die cut embellishments, including the sentiment, from the Spellbinders Small Die set.  I tucked the spooky cat between the fences and added the cute little ghost to the side of the panel to make it look like he's peeking out.  The tree and headstone images on the back panel were stamped using Midnight ink from Catherine Pooler Designs.  I used two sizes of circle punch by Stampin' Up! to cut the moon out of gold glitter paper from the Lawn Fawn Autumn Glitter Paper collection - after the larger circle was cut, I used the smaller circle to cut the crescent shape.  It took a couple of tries to get the look I wanted.


Isn't he a cute and happy looking ghost?  That's why I like him so much!


Above is a panned out view of the card.  Notice that I added the ornate skull-topped piece to the top of the card.  I wanted it to look like the entrance to the graveyard.

Thursday, October 04, 2018

Creating Pocket Scrapbooking Cards

General Travel Theme

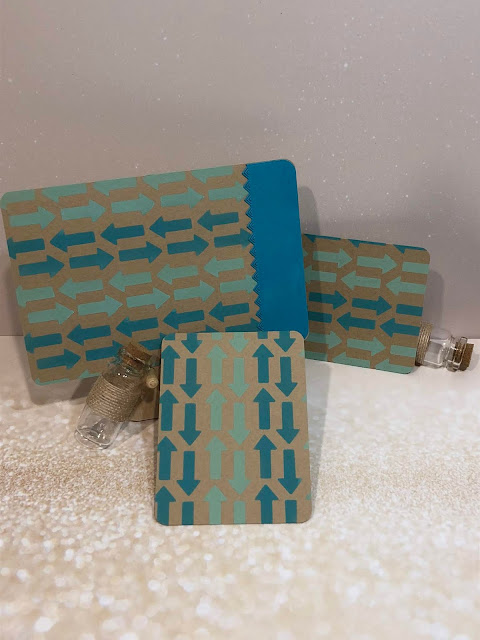
The pocket scrapbooking card-making idea really caught on with me.  I decided to make some general cards and a couple of cards.  I used a kraft cardstock base, the My Favourite Things Arrows Abound stencil and Distress Oxide inks.  I used a small sponge dauber to alternate the light green-blue with the darker blue for added interest. 

To jazz up the larger card, I added a scrap of blue paper to the bottom of the card, die cut to match the shape of the card and also with a zigzag border die from Pretty Pink Posh. 

I like that these cards have a simple background pattern, but that the colour on the kraft makes the arrow design pop.
This is a similar design using another common travel theme:  planes.  Kraft cardstock base with Black Soot Distress ink used to ink the planes through the stencil (Carta Bella's "Planes").  A simple set of cards that can be used for a variety of trip themes, so long as a plane is involved of course!

Below is another general themed card that can be used for a variety of trips -- a world map.  I stamped the Darkroom Door World Map on a scrap of dark brown cardstock and embossed it with gold embossing powder.  The other version was stamped in Dark Chocolate ink on Honey Mustard cardstock (both Gina K Designs).

Tuesday, October 02, 2018

Halloween Tea Light Boxes


Spellbinders Large Die of the Month Club

The September large dies are fantastic.  I love the Halloween theme for the Spellbinders September large die of the month. It includes dies to create a tea light holder with four different Halloween themed plates.
This is the pumpkin plate used four times, shown lit up with a tea light in both light . . .
. . . and dark settings.
The second of the four design plates is a trick or treat sentiment. Again, photographed in the light (left) and dark (below).

They look so nice lit up, don't they?


And a black cat! My nephew has a black cat and he's going to love this!


And ghosts, too!  How adorable are these little guys?
 Little "ghosteses" all lit up!
My parents aren't as into Halloween as my sister and nephew, so I made just one tea light holder for them, but I used one of each plate so they can turn it around to whatever design they want to look at (above and right).

I hope Spellbinders does a Christmas version of this die set.

Sunday, September 30, 2018

Pocket Scrapbooking Cards

Camping Theme

Have you ever thought of making your own pocket scrapbooking cards?  I have a lot that I've purchased, but sometimes they just aren't exactly what I want for my layout.  I don't know why I didn't think of this earlier, but I've started making some of my own cards.  I have a ton of great background stamps, camping stamps and stencils that I can use for this purpose.  And, I have the Lawn Fawn dies for pocket scrapbooking - they create the perfect size of card, both large and small.  All you have to do is die cut, stamp, stencil and embellish.

For this set of cards I used Warm Cocoa ink by Gina K Designs to stamp the MFT In the Wilderness background stamp on Gina K Designs' Fresh Asparagus cardstock.  I added accents on the larger cards with a strip of Kraft cardstock, also by Gina K Designs.  When I'm ready to use the cards, I can add a sentiment or short description to that section.

Same design and cardstocks (in reverse) for this set, but I used dark green ink to stamp the SSS Tree Background stamp on the Kraft cardstock.  It seemed appropriate for trees.

For this set, I used the Holiday Foliage stencil from Newton's Nook as the pattern and applied green and brown distress inks, using a sponge dauber, to the leaves and pine cones.  The cardstock for the base is Kraft by Gina K Designs and the large card is accented with Dark Chocolate cardstock cut with the Forest Border Lawn Fawn die.

The cardstock base in this set is Honey Mustard (GKD) and I used  Tim Holtz Mini Stencil 32 with blending ink to create the tree pattern.  As I have the mini stencil, I had to overlap and repeat my blending several times on the larger cards to fill the entire panel.

In each set I tried to make vertical and horizontal cards in both the 4 X 6 and 2 X 3 sizes.  Some sets I used both sides of the card and made a vertical pattern on one side and a horizontal pattern on the other.  This way, the cards will fit with whatever layout style I choose.
Another tree-based set of cards using the MFT In the Woods stencil, distress ink blending and Honey Mustard (GKD) cardstock.
These background stamps by Impression Obsession, called "Rocks" and "Stones", create very realistic backgrounds.  These will be great for layouts of camping trips where we take the puppies down to the river.  I love the detail in these stamps.
This is a great stamp by So Suzy Stamps ("Hammock") and I thought it would be fun to incorporate into my scrapbook.  My husband and I received hammocks for Christmas one year and we use them for reading and relaxing while we are camping, so this stamp is perfect!  Again, a vertical and a horizontal version.  Simple cards with only the stamp, in Versafine Onyx Black ink, on plain Gina K Designs Kraft cardstock.